Andrewjmast (talk | contribs) No edit summary |
m (Undo revision 39475 by 176.65.81.57 (talk)) Tag: Undo |
||
| (34 intermediate revisions by 26 users not shown) | |||
| Line 1: | Line 1: | ||
| − | {{DLC Prison infobox |
||
| − | | image = Escape Team.png |
||
| − | | caption = DLC Prison |
||
| − | | seclevel = Moderate |
||
| − | | difficulty = |
||
| − | | inmates = 4 |
||
| − | | guards = 15 |
||
| − | }} |
||
| − | ==Summary== |
+ | == Summary== |
| + | {{Prison infobox|guards=15|inmates=4|Caption=DLC prison}} |
||
| − | Escape Team is a DLC prison that was released on the 30th of June, 2015 and is a military prison with 4 [[inmates]] and |
+ | Escape Team is a DLC prison that was released on the 30th of June, 2015 and is a military prison with 4 [[inmates]] and 15 [[guards]] (soldiers in this prison). It is heavily based off of the |
| − | A-Team. The escape route |
+ | A-Team. The escape route is a tank on the eastern part of the compound, just underneath the rollcall area (not to be confused with the golden tank monument). In order to escape, you have to craft the makeshift tank turret, the makeshift tank base, and then fire it with an item made with a lighter and a taper to make the bullet fire and destroy a reinforced concrete wall which lets you run out of the prison. |
| − | Around the compound there are some green desks with a target on them, inside the desks there are a lot of useful items for your escape. |
||
| − | The [[inmates]] wear |
+ | Around the compound there are some green desks with a target on them. Inside the desks there are a lot of useful items such as corrugated iron and metal tubes which are essential to your escape. The [[inmates]] wear white and black striped uniforms. The guards wear soldier uniforms. The music is different in all the time periods. The music for Meal Time, Exercise Period, Shower Block and Rollcall are all remixes of the music in the original prisons. |
== Schedule == |
== Schedule == |
||
| Line 42: | Line 34: | ||
==[[Jobs]]== |
==[[Jobs]]== |
||
| − | * Janitor |
+ | * Janitor |
| − | * Laundry |
+ | * Laundry |
* Woodshop |
* Woodshop |
||
* Deliveries |
* Deliveries |
||
| Line 63: | Line 55: | ||
===Tank Items=== |
===Tank Items=== |
||
| − | The prison has |
+ | The prison has one very specific way of escaping. As stated before, the player must repair and arm a tank to blow through a wall. After that, they will simply walk out. This can even take place during the day without the guards noticing. Escaping is mostly easy, but the tank resets when you go to sleep, so you have to keep everything and use it all in the same day. To use a part you made, select it and click on the tank. |
Items that go on the tank (In order requested): |
Items that go on the tank (In order requested): |
||
| Line 69: | Line 61: | ||
* {{item link| Makeshift Explosive Round}} |
* {{item link| Makeshift Explosive Round}} |
||
* {{item link| Makeshift Fuse}} (Note: Using this will cause the tank to fire. After you've done this, run!) |
* {{item link| Makeshift Fuse}} (Note: Using this will cause the tank to fire. After you've done this, run!) |
||
| − | |||
===Outfit Items=== |
===Outfit Items=== |
||
| Line 77: | Line 68: | ||
===Gift Items=== |
===Gift Items=== |
||
| − | There are also unique items in the Escape Team map. Giving these items to the right inmates will increase their opinion largely. |
+ | There are also unique items in the Escape Team map. Giving these items to the right inmates will increase their opinion largely. You can also give these items to guards for a small opinion boost (except Bag of Trash). |
* {{item link| Aftershave}} (Give this to Andy for an achievement.) |
* {{item link| Aftershave}} (Give this to Andy for an achievement.) |
||
| Line 110: | Line 101: | ||
== Escape Plan == |
== Escape Plan == |
||
| + | First, you'll need to work on your strength. After you have a good amount of strength, knock out a soldier and take a [[Taper]] and a [[Mixing Container]]. Also take a [[Guard Outfit]], as you will need it next. Craft the [[Taper]] with a [[Lighter]] to create the last item you’ll need, the [[Makeshift Fuse]]. |
||
| − | Before you escape you'll need some items such as... |
||
| − | |||
| − | 1 [[Bed Dummy]]. |
||
| − | |||
| − | 1 [[Sturdy Pickaxe]]. |
||
| − | |||
| − | 2 [[Poster|Posters]]. |
||
| − | |||
| − | 1 [[Soldier Outfit]]. |
||
| − | |||
| − | 1 [[Plastic Staff Key]] |
||
| − | |||
| − | 3 [[Roll of Duct Tape|Rolls of Duct Tape]] |
||
| − | |||
| − | 1 [[Lighter]] |
||
| − | |||
| − | I.) Knock out a solider and take a [[Taper]] and a [[Mixing Container]]. |
||
| − | |||
| − | II.) Next, use the [[Plastic Staff Key]] and go into the Solider sleeping area to the North East of the shower block. |
||
| − | |||
| − | III.) Here you should see a green desk. Go and look inside, you should see some [[Charcoal]], Grab only one. |
||
| − | |||
| − | IV.) Chip a hole in the cell wall where Cage can't see it and cover it up with a [[Poster]]. |
||
| − | |||
| − | V.) Next, wait until night time and put on your [[Soldier Outfit]] and have the [[Bed Dummy]] in the bed, after that grab your [[Sturdy Pickaxe]] and the leftover [[Poster]]. |
||
| − | |||
| − | VI.) Leave the cell replacing the [[Poster]] and head for the gardening shed. |
||
| − | |||
| − | VII.) Now chip a hole in the wall and cover it up with a poster. |
||
| − | |||
| − | VIII.) Take one bag of [[Fertilizer]], take the poster and cover up the hole with a [[Wall Block]]. |
||
| − | |||
| − | IX.) Next, go down to the South West corner of the prison. |
||
| − | |||
| − | X.) Chip a hole in the wall to the left of the sealed off room with the green desk. |
||
| − | |||
| − | XI.) Once inside, go around to the right side of the sealed room, then chip a hole in the wall below above the crate. |
||
| + | Now, take the guard's outfit and go into the Soldier sleeping area northeast of the shower block. This area has green beds. You will need the [[Guard Outfit]] to enter. There is a green desk with a Target on it. Open it, and take one [[Charcoal]]. You should enter this area when there aren't other guards around, as they will bust you if they catch you, even with the [[Guard Outfit]] on. |
||
| − | XII.) As you can see... you still can't enter. So, chip the wall below the wall you just chipped. |
||
| + | Next, knock out the officer with the red staff key and create two key molds using [[Putty]] and [[Molten Plastic]]. After creating fake keys, head southeast of the map. There should be a somewhat large building, just east of solitary. You should see a red double door north of the building. You can either use the [[Plastic Staff Key]] you created or chip the wall next to it to get in. Keep in mind, you can only enter at night if you choose to chip the wall, as you will instantly be sent to solitary if the wall is gone during the day. There should be a desk near the bottom of the building. Open the desk and take a [[Metal Tube]], a [[Corrugated Iron]], and a [[Metal Cone]]. You will also need to head north of the building. There is a wall completely surrounding a green desk with a target on it. You will need to chip this wall, but you can do so during the day. You will need to use a poster to cover the hole. Keep in mind that the guards are less likely to find you chipping if you chip the east wall rather than the west wall. Take one [[Potassium]]. |
||
| − | XIII.) Now take one [[Potassium]] and go to the metal shed. |
||
| + | You can complete this next step in one of two ways. The easiest is to get the Gardener Job. To get this job you will need to distract the inmate who has the job. This shouldn’t be too hard, as you can just recruit them for the whole job period as long as their opinion is above 90. You can also chip into this building, or obtain the green work key and use that to enter. After you enter using one of these methods, take one bag of [[Fertilizer]]. After that, you won’t need to enter this room again. |
||
| − | XV.) Use the Plastic Staff Key to enter and take two of each the [[Metal Tube]] and the [[Corrugated Iron]] and one [[Metal Cone]]. |
||
| + | Finally, there is a building with two metal containers and one green desk with a target on it. Enter this building by chipping it and using a poster or by using the red staff key. Take a [[Metal Tube]] and a [[Corrugated Iron]]. |
||
| ⚫ | |||
| − | + | Return to your cell and craft a [[Makeshift Fuse]], [[Makeshift Explosive Round]], and the [[Makeshift Tank Turret]]. (See above for crafting recipes) |
|
| ⚫ | |||
| − | [[Makeshift Fuse]]. |
||
| − | XVIII.) RUN OUT THE OPENING!!! |
||
| + | [[Category:The Escapists 1 Maps]] |
||
| − | -''Negative Two Gaming'' |
||
Revision as of 14:55, 25 September 2021
Summary
| Escape Team | |
|---|---|
| |
| Details | |
| Inmates | 4 |
| Guards | 15 |
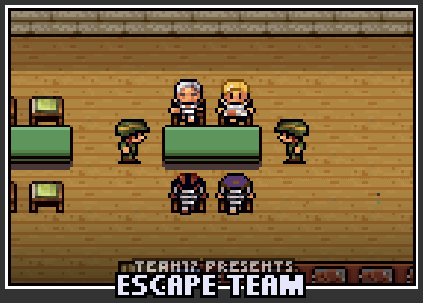
Escape Team is a DLC prison that was released on the 30th of June, 2015 and is a military prison with 4 inmates and 15 guards (soldiers in this prison). It is heavily based off of the A-Team. The escape route is a tank on the eastern part of the compound, just underneath the rollcall area (not to be confused with the golden tank monument). In order to escape, you have to craft the makeshift tank turret, the makeshift tank base, and then fire it with an item made with a lighter and a taper to make the bullet fire and destroy a reinforced concrete wall which lets you run out of the prison. Around the compound there are some green desks with a target on them. Inside the desks there are a lot of useful items such as corrugated iron and metal tubes which are essential to your escape. The inmates wear white and black striped uniforms. The guards wear soldier uniforms. The music is different in all the time periods. The music for Meal Time, Exercise Period, Shower Block and Rollcall are all remixes of the music in the original prisons.
Schedule
| 08:00 - 09:00 | Morning Rollcall |
| 09:00 - 10:00 | Breakfast |
| 10:00 - 13:00 | Leisure / Work Period |
| 13:00 - 14:00 | Afternoon Rollcall |
| 14:00 - 16:00 | Free Period |
| 16:00 - 17:00 | Evening Meal |
| 17:00 - 18:00 | Exercise Period |
| 18:00 - 19:00 | Shower |
| 19:00 - 22:00 | Evening Free Time |
| 22:00 - 23:00 | Evening Rollcall |
| 23:00 - 08:00 | Lights Out |
Jobs
- Janitor
- Laundry
- Woodshop
- Deliveries
Exclusive Items
Crafting Items
 Makeshift Tank Barrel
 Makeshift Tank Firing Base
 Explosive Compound
- Explosive Mix
- Metal Tube
- Corrugated Iron
- Taper
- Charcoal
- Potassium
- Fertilizer
Tank Items
The prison has one very specific way of escaping. As stated before, the player must repair and arm a tank to blow through a wall. After that, they will simply walk out. This can even take place during the day without the guards noticing. Escaping is mostly easy, but the tank resets when you go to sleep, so you have to keep everything and use it all in the same day. To use a part you made, select it and click on the tank. Items that go on the tank (In order requested):
- Makeshift Tank Turret
- Makeshift Explosive Round
- Makeshift Fuse (Note: Using this will cause the tank to fire. After you've done this, run!)
Outfit Items
Gift Items
There are also unique items in the Escape Team map. Giving these items to the right inmates will increase their opinion largely. You can also give these items to guards for a small opinion boost (except Bag of Trash).
- Aftershave (Give this to Andy for an achievement.)
- Sovereign Ring (Give this to Cage for an achievement.)
- Trash Bag (Give this to Sean for an achievement.)
Recipes
The following recipes are unique to the Escape Team map. Most of these parts will not be found anywhere else.
| Result | Requirements | Intelligence |
|---|---|---|
| None | ||
| None | ||
| None | ||
| None | ||
| None | ||
| None | ||
| None |
Escape Plan
First, you'll need to work on your strength. After you have a good amount of strength, knock out a soldier and take a Taper and a Mixing Container. Also take a Guard Outfit, as you will need it next. Craft the Taper with a Lighter to create the last item you’ll need, the Makeshift Fuse.
Now, take the guard's outfit and go into the Soldier sleeping area northeast of the shower block. This area has green beds. You will need the Guard Outfit to enter. There is a green desk with a Target on it. Open it, and take one Charcoal. You should enter this area when there aren't other guards around, as they will bust you if they catch you, even with the Guard Outfit on.
Next, knock out the officer with the red staff key and create two key molds using Putty and Molten Plastic. After creating fake keys, head southeast of the map. There should be a somewhat large building, just east of solitary. You should see a red double door north of the building. You can either use the Plastic Staff Key you created or chip the wall next to it to get in. Keep in mind, you can only enter at night if you choose to chip the wall, as you will instantly be sent to solitary if the wall is gone during the day. There should be a desk near the bottom of the building. Open the desk and take a Metal Tube, a Corrugated Iron, and a Metal Cone. You will also need to head north of the building. There is a wall completely surrounding a green desk with a target on it. You will need to chip this wall, but you can do so during the day. You will need to use a poster to cover the hole. Keep in mind that the guards are less likely to find you chipping if you chip the east wall rather than the west wall. Take one Potassium.
You can complete this next step in one of two ways. The easiest is to get the Gardener Job. To get this job you will need to distract the inmate who has the job. This shouldn’t be too hard, as you can just recruit them for the whole job period as long as their opinion is above 90. You can also chip into this building, or obtain the green work key and use that to enter. After you enter using one of these methods, take one bag of Fertilizer. After that, you won’t need to enter this room again.
Finally, there is a building with two metal containers and one green desk with a target on it. Enter this building by chipping it and using a poster or by using the red staff key. Take a Metal Tube and a Corrugated Iron.
Return to your cell and craft a Makeshift Fuse, Makeshift Explosive Round, and the Makeshift Tank Turret. (See above for crafting recipes)
Now you are just about finished! Go to the green tank and apply the Makeshift Tank Turret, the Makeshift Explosive Round, and finally use the Makeshift Fuse. After that, you will have escaped!