mNo edit summary |
Tag: Manual revert |
||
| (41 intermediate revisions by 33 users not shown) | |||
| Line 1: | Line 1: | ||
{{prison infobox |
{{prison infobox |
||
| flavor = La Cucaracha! |
| flavor = La Cucaracha! |
||
| − | | seclvl = Camp |
+ | | seclvl = Prison Type: Camp |
| − | | difficulty = Hard |
+ | | difficulty = Difficulty: Hard |
| inmates = 15 |
| inmates = 15 |
||
| guards = 10 |
| guards = 10 |
||
}} |
}} |
||
{{Quote|This is the notorious San Pancho, the roughest toughest and downright nastiest prison south of the border. The blistering heat and claustrophobic conditions here turns inmates angry and violent. Even the guards daren't enter. |
{{Quote|This is the notorious San Pancho, the roughest toughest and downright nastiest prison south of the border. The blistering heat and claustrophobic conditions here turns inmates angry and violent. Even the guards daren't enter. |
||
| − | |Warden |
+ | |Warden Bob Ryan|Prison arrival}} |
| − | San Pancho is the fifth map present in the main game, preceded by [[Jungle Compound]] and succeeded by [[HMP |
+ | San Pancho is the fifth map present in the main game, preceded by [[Jungle Compound]] and succeeded by [[HMP Irongate]]. |
| − | The prison holds 16 inmates (yourself included), has 10 Guards that never patrol in the compound except 3 for Routine, has an electric fence around the prison and a jeep patrolling the outside. It holds 4 inmates per cell. Most of the time there is an unoccupied desk in your cell. |
+ | The prison holds 16 inmates (yourself included), has 10 Guards that never patrol in the compound except 3 for Routine, has an electric fence around the prison and a jeep patrolling the outside. It holds 4 inmates per cell. Most of the time there is an unoccupied desk in your cell. It’s easy to get away with stuff guards won't like such as chipping walls because they don't patrol the area except in routines. San Pancho's security is very high, as it has a 2 block thick perimeter wall and landmines in between, making an escape above ground nigh-impossible. In the Mobile/Console editions with HMP Irongate nerfed ([[Camera]] in only half of the cells and guards only use batons), both prisons can be found equally hard. |
| − | San Pancho also has |
+ | San Pancho also has its own unique free time music. |
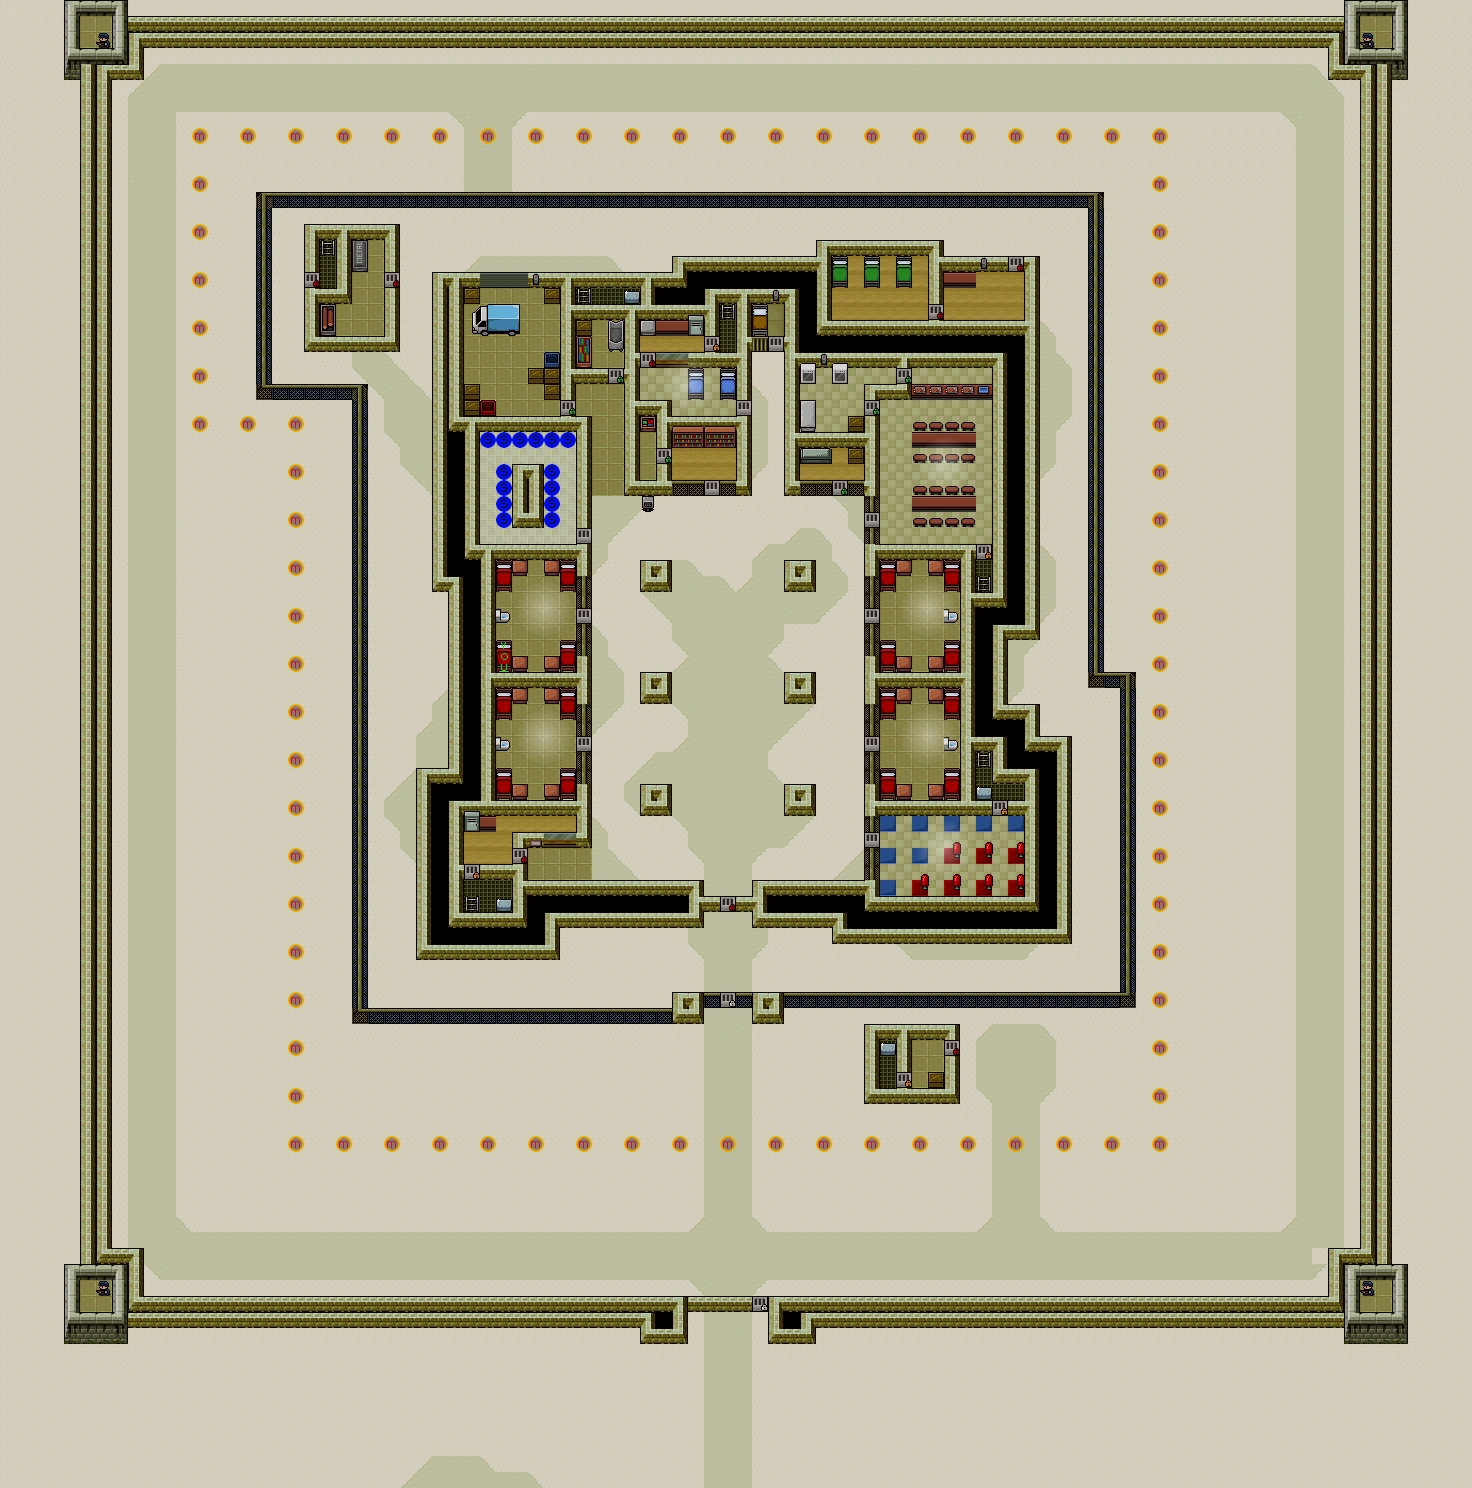
[[File:San Pancho Map.png|thumb]] |
[[File:San Pancho Map.png|thumb]] |
||
| Line 18: | Line 18: | ||
=== Lack of supervision === |
=== Lack of supervision === |
||
| − | A brutal prison with unforgivingly hot weather, San Pancho makes the inmates |
+ | A brutal prison with unforgivingly hot weather, San Pancho makes the inmates so ferocious and bad-tempered to the point the guards are frightened of them. Guards do not patrol the inmate section of the prison whatsoever, allowing for the player to get away with a lot of illegal activities. Three [[guards]] will be present at [[meals]], [[Exercise|exercises]], [[showers]] and [[Roll call|roll calls]]. |
| − | In addition to that, the prison lacks any [[ |
+ | In addition to that, the prison lacks any [[Scanner|scanners]] to detect contraband, making [[foil]] useless. [[Camera|Cameras]] are also not present except for the [[Solitary]], the kitchen, and the cargo job room. |
=== Landmines === |
=== Landmines === |
||
The prison features landmines (Marked as orange dots labeled 'M' on the map) at the perimeter of the prison beyond the [[Electric Fence]], forcing the player to [[tunnel]] underground for their escape. Attempting to cross the perimeter beyond the fences on ground level will kill the player at all circumstances. |
The prison features landmines (Marked as orange dots labeled 'M' on the map) at the perimeter of the prison beyond the [[Electric Fence]], forcing the player to [[tunnel]] underground for their escape. Attempting to cross the perimeter beyond the fences on ground level will kill the player at all circumstances. |
||
| ⚫ | Landmines are invisible on ground level, however they can be seen underground and will take one block space, displacing a usual [[dirt]] block. Landmines will explode if a player approaches ~3 block radius on ground level. They will also explode if a player comes into contact underground while |
||
| + | |||
| ⚫ | [[Land Mine|Landmines]] are invisible on ground level, however they can be seen underground and will take one block space, displacing a usual [[dirt]] block. Landmines will explode if a player approaches ~3 block radius on ground level. They will also explode if a player comes into contact underground while tunneling. They deal infinite damage, instantly knocking out the player and sending him to [[Infirmary]] or their cell depending on the time. |
||
=== Jeeps === |
=== Jeeps === |
||
| − | A [[jeep]] patrols the perimeter of the prison beyond the |
+ | A [[jeep]] patrols the perimeter of the prison beyond the Electric Fence, further deterring escape attempts. If you are caught by the jeep while wearing [[POW Outfit]] or its variants, you will be immediately sent to Solitary. They can be avoided by wearing [[Guard Outfit]] at night or by using [[Stinger Strip]]<nowiki/>[[Stinger Strip|s]] to destroy the tires. |
==Schedule== |
==Schedule== |
||
| Line 55: | Line 56: | ||
|} |
|} |
||
| − | [[Guards]] will only be present to supervise at |
+ | [[Guards]] will only be present to supervise at Roll calls, Meals, Exercise periods, and Showers. |
| − | You can stay out of your cell after [[Lights out]] (without a [[Bed Dummy]]) undetected for approximately ~1 hour in game time due to the guards rarely patrolling the cells. |
+ | You can stay out of your cell after [[Lights out]] (without a [[Bed Dummy]]) undetected for approximately ~1 hour in game time due to the guards very rarely patrolling the cells. |
==[[Jobs]]== |
==[[Jobs]]== |
||
| Line 68: | Line 69: | ||
== Strategies to Escape== |
== Strategies to Escape== |
||
| + | === Common Method === |
||
| − | === Escape without [[Guard Outfit]]<nowiki/>s === |
||
| + | |||
1. Get 8 [[Plastic Fork]]s. |
1. Get 8 [[Plastic Fork]]s. |
||
| Line 75: | Line 77: | ||
3.Create a [[Bed Dummy]] |
3.Create a [[Bed Dummy]] |
||
| − | 4. At the wall of the [[Tailor]] workshop, chip away the wall so you can get into the tailor station. (The station is located near to the Deliveries job workshop.) An optional way to do it is to get the Tailor job. Just distract them by ether knocking them |
+ | 4. At the wall of the [[Tailor]] workshop, chip away the wall so you can get into the tailor station. (The station is located near to the Deliveries job workshop.) An optional way to do it is to get the Tailor job. Just distract them by ether knocking them out and stealing their clothes repeatedly, or hit them once and run around the courtyard until 13:00 when work ends. This will allow you to use work periods as a time to safely work instead of during other periods. |
| − | 5. Chip the wall beyond the station, so you have access to the |
+ | 5. Chip the wall beyond the station, so you have access to the maintenance tunnel (the area with a black tile floor). You should see a ladder, and a prisoner stash. Cover the two holes with a [[Poster]], or you'll be sent to Solitary. |
| − | 6. Obtain a very good digging/chipping tool. [[Multitool]] is the best. You will also need a good cutting tool; [[Sturdy Cutters]] are the best. 3 [[Wire|Wires]]<nowiki/> are also necessary in order to make a [[Fake Fence]]. However, likewise from my experience, there is no need to bring a |
+ | 6. Obtain a very good digging/chipping tool. [[Multitool]] is the best. You will also need a good cutting tool; [[Sturdy Cutters]] are the best. 3 [[Wire|Wires]]<nowiki/> are also necessary in order to make a [[Fake Fence]]. However, likewise from my experience, there is no need to bring a Fake Fence like you will see in step 13. |
7. Get your intellect up to 80+. |
7. Get your intellect up to 80+. |
||
| + | 8. Find a guard with a [[Utility Key]]. This may be an issue to even find a guard alone because they only patrol outside the prison unless conducting showers, meals, exercise periods, and roll calls. Take his outfit, the Utility Key, and [[Baton]] if needed. |
||
| − | - You can escape prison without applying number; 8,9,10,12,13 (Through my mobile game experience). |
||
| ⚫ | 9. Create a plastic version of it; you need a [[Wad of Putty]] and [[Molten Plastic]]. Combine the Utility Key with Wad of Putty. This'll give you a [[Key Mold|Utility Key Mold]], and a Utility Key. Put the key back into the pocket of the guard. Combine the Utility [[Key Mold]] with Molten Plastic, and ta-da! You got yourself a [[Plastic Key|Plastic Utility Key]]! Make sure to put the real key back on the guard! |
||
| − | 8. Find a guard with a [[Utility Key]]. This may be an issue to even find a guard alone because they only patrol outside the prison unless conducting [[Showers]], [[Meals]], [[Exercise|Exercise periods]], and [[Roll call|Roll calls]]. You can isolate a guard by doing an illegal activity (digging, chipping, etc.), and making your cellmates call you out (Do this in a cell, preferably during Free Time, so inmates wander into their cells and catch you). A guard will then go to your area. When you get the target guard alone, knock him out with a [[Cup of Molten Chocolate]] or a very good weapon, and very good stats ([[Plated Inmate Outfit|armor]] is optional). Take his outfit, the [[Utility Key]], and [[Baton]] if needed. |
||
| ⚫ | |||
| ⚫ | 9. Create a plastic version of it; you need a [[Wad of Putty]] and [[Molten Plastic]]. Combine the |
||
| ⚫ | 11. Go to the maintenance tunnel of the tailor station, then dig down. Dig straight until you meet a blue fence. Remember to brace the tunnel with [[Timber Brace]]s! (Make sure you DO NOT dig under where the Prisoner stash or ladder is otherwise you will end up hitting a landmine later on! Although digging under a landmine doesn't do anything, so just dig past, or move to the left or right from your escape hole 1 block.) |
||
| ⚫ | |||
| ⚫ | 12. At nighttime, put the [[Bed Dummy]] into your bed. Put your [[Guard Outfit]] on. Your inventory should look like this: Plastic Utility Key, [[Plastic Cell Key]], your cutting tool, and Fake Fence. Go to the canteen (Eating place). If you did not make a plastic cell key, then you will need to chip through to either the garden supply room or the kitchen, and then to outside. connected to the canteen there should be a door with a orange lock (cyan on console) and beyond the door, a ladder. Go up to the ladder! |
||
| ⚫ | 11. |
||
| ⚫ | 13. You should be on the roof. Go north, then you'll see the [[Generator]]. Cut the fence near the Generator, shut off (Left click), put the Fake Fence where you've cut it or just leave it. (Only from my experience). then run back to your tunnel as quick as you can, then cut off the electric fence as soon as you can. It'll no longer zap you because the Generator is off. If you are too slow the generator will turn back on and you will need to repeat this step . (This step is not required for the NS edition, as the fences are not electrified) |
||
| ⚫ | 12. At nighttime, put the [[Bed Dummy]] into your bed. Put your [[Guard Outfit]] on. Your inventory should look like this: |
||
| ⚫ | |||
| ⚫ | 13. You should be on the roof. Go north, then you'll see the [[Generator]]. Cut the fence near the |
||
| ⚫ | |||
| − | 14. Go back to your cell and save. |
||
| − | |||
| ⚫ | |||
| − | |||
| ⚫ | |||
'''The Escape''' |
'''The Escape''' |
||
| − | 1. At night, put the |
+ | 1. At night, put the Bed Dummy into the bed and equip the Guard Outfit on. Your inventory should look like this: Your digging/chipping tool, 3 or 4 Stinger Strips, and extra food (optional) |
2. At the very end of your tunnel, wait until you hear the perimeter jeep. After the jeep sound is gone, dig up! |
2. At the very end of your tunnel, wait until you hear the perimeter jeep. After the jeep sound is gone, dig up! |
||
| − | 3. Cover the tunnel with the [[Dirt]] you just obtained. Put one |
+ | 3. Cover the tunnel with the [[Dirt]] you just obtained. Put one Stinger Strip one tile below you. That's the route for the jeep, and the Stinger Strip should flat-tire the jeep. If you did not get stinger strips, then follow the wall counter-clockwise to the entrance at the south end of the prison, where the wall is one layer thick instead of two, and chip through. |
4. Put the next strip 4-6 blocks left to the first strip. But, don't walk around, or you'll be blown up immediately! If you want to walk around, hug the edge, as if you are stuck to the wall. Don't get out of the wall except if you place the strips! |
4. Put the next strip 4-6 blocks left to the first strip. But, don't walk around, or you'll be blown up immediately! If you want to walk around, hug the edge, as if you are stuck to the wall. Don't get out of the wall except if you place the strips! |
||
| − | 5. Now, chip the wall where you want to chip. Careful of jeeps, but they'll be disabled with the strips |
+ | 5. Now, chip the wall where you want to chip. Careful of jeeps, but they'll be disabled with the strips. When they get flat-tired, you'll hear a shooting sound. There are two layers of walls, but if you get through them, you can say goodbye to San Pancho! |
| ⚫ | |||
| − | ===Escape without [[Stinger Strip]]s=== |
||
| − | Same preparation excluding step 15. Also, The best place to put contraband excluding the bed dummy for this is your tunnel just in case you ARE cell searched. |
||
| ⚫ | |||
| ⚫ | |||
| − | # At night, put the bed dummy on your bed. |
||
| − | # Go back to your tunnel and put on the guard outfit. |
||
| − | # You will need digging and chipping tools. Multitool will be the fastest. |
||
| − | # Wait for the jeep to pass by. After the truck fades, dig up! |
||
| − | # Cover the hole with dirt. |
||
| − | # Go to the small walls. Wait for the jeep to pass by. |
||
| − | # Chip the walls after the jeep is gone. |
||
| − | # Place the wall block in it's place. |
||
| − | # Escape! (You need Bed dummy, guard outfit, multitool, dirt) |
||
| ⚫ | |||
| − | |||
| ⚫ | |||
| − | a grappling hook, a sheet rope, and a fake fence. |
||
| − | |||
| ⚫ | |||
Go east and use the grappling hook on the wall. Keep going east and use the sheet |
Go east and use the grappling hook on the wall. Keep going east and use the sheet |
||
rope.Go to the generator and cut the fence surrounding it, left click to shut it off, and |
rope.Go to the generator and cut the fence surrounding it, left click to shut it off, and |
||
| Line 139: | Line 121: | ||
and cut the fence, since the generator is off and it won't shock you. |
and cut the fence, since the generator is off and it won't shock you. |
||
| − | === Other Methods=== |
+ | === Other Methods === |
| + | |||
| ⚫ | # From your cell, tunnel towards the main door (make sure to cover the hole with a desk) from which the guards enter the prison. Keep tunneling until you reach a rocky barrier that you can no longer tunnel through. (Note: a multitool is the fastest way to dig). At lights out, put on a guards outfit, and then head into your tunnel. Wait until you hear the jeep pass and then dig up. Then with the pickaxe, chip through both walls, and replace the bricks as you go and then your home free!! |
||
| + | |||
| ⚫ | # For this method, you’d want 5 [[poster]]s in these locations: The middle of the bottom wall of your cell, The middle of the bottom of that cell, To the right wall of the job area where you can’t access normally (you should be in there now), One to the left of the door to the tailor job (you can skip this if you get the tailor job), and one on the north wall of the tailor job. At night, pit on a guard outfit and go up the ladder. Use a sheet rope to go down on the left side. You have to be precise to go on the wire. If you fall, you’ll need to get a red key to go back to the main campus. If you don’t fall, go down the ladder on the building. You’ll end up next to an infinite supply of [[timber]] and [[metal sheet]]s. If you want, you can chip through to it and get it. But even if you do, you’ll have to dig. You can dig 4 spaces to reach the fence. On the mobile game, the fence isn’t electric. I can’t guarentee it won’t be electric on other systems. Get past the fence and dig until you can dig up. The [[guard]]s won’t catch you because they never patrol this area. After you dig up, go to the outer wall. If you want, you can ambush the Jeep with [[stinger strip]]s. In my escape, I was able to chip through the outer wall. If you can’t, just dig under it. Once you dig up from your hole, you have to escape on that run. If you don’t, your hole will be covered and you’ll lose all progress. |
||
| + | |||
| + | === Digging === |
||
| + | |||
| + | [[Land Mine]]s surround the entire perimeter of the main prison complex beyond the electric [[fence]]. There is no way for the player to escape on ground level, as the mines will explode no matter where you try and escape from. Therefore you must [[tunnel]] out to escape. |
||
| + | |||
| + | '''Preparation''' |
||
| + | |||
| + | * Gather supplies to craft [[Sturdy Shovel]]s and optionally [[Sturdy Pickaxe]]s for crafting the [[Multitool]]. |
||
| + | * Also bring [[Candle]]s if light is needed, and [[Timber Brace]]s in abundance to support the tunnel. |
||
| + | * [[Sturdy Cutters]] should be crafted to cut through the underground electric fence. |
||
| + | * Collect materials to craft two [[Plastic Key]]s, namely the Cell and Utility keys. |
||
| + | * Obtain a [[Guard Outfit]] and [[Bed Dummy]] for nighttime maneuvers. |
||
| + | * Plan out a tunneling escape - particularly find ways to dispose of [[Dirt]] safely. |
||
| + | |||
| ⚫ | |||
| + | |||
| + | The best way to escape is to start in your cell and use your [[desk]] to cover the hole. Dig west (to the left) until you encounter the underground fence. |
||
| + | |||
| + | The fence cannot be cut, as it is electrified. You must first go up on the roof to disable the [[Generator]]. The recommended way to do this is to place a bed dummy in your bed after lights out, and exit your cell into the canteen and enter the utility corridor to the bottom right of the canteen. The ladder will go to the roof and the generator will be directly up north from the ladder. The generator will restart after 1 in game hour, so you've got to be quick! Be advised that the generator on the roof is surrounded by a fence, so you must bring a cutting tool to the roof with you. |
||
| + | |||
| + | Once the fence underground is cut, you can continue digging your tunnel. In your tunnel, dig a few spaces west, and you will be able to see the land mines. Dig your tunnel around them, being careful not to touch the space they occupy or they will explode. Dig your tunnel a good 4 or 5 spaces past all of the mines and then you are safe to dig up to the surface to escape! Beware of the patrol [[jeep]] that circles the perimeter above on the surface beyond the mine field. If the jeep rolls by and spots any damage to the surface, even an incomplete hole, you will be sent to [[Solitary]]. Note that the jeep goes counter-clockwise around the perimeter (so if you are on the left side, the jeep will be coming down south). You can hear the jeep pass by from underground. Wait for the sound to pass and then dig up. Alternatively, a [[Stinger Strip]] can be used at the surface to disable the jeep, but since you are digging, this is not a viable option. |
||
| + | |||
| + | Every time you start a new game in San Pancho, the land mine placement will be generated randomly, but in the same vicinity. So one playthrough you may not have a mine blocking your tunnel path, but another game you might have several mines in your way! Always be prepared to dig around the mines whenever you play San Pancho! |
||
| + | |||
| + | === Tunneler's Dream === |
||
| + | '''Tunnel Prep''' |
||
| + | |||
| + | # Get the delivery job. This can be accomplished by either knocking the current delivery inmate out and keeping him out with a rope or duct tape or repeatedly knocking him out (not advisable) or hitting him once and running around the courtyard with him chasing you, while making sure to not break his aggro on you. |
||
| + | # Get your hands on as many digging and chipping tools as possible. Plastic forks and spoons, trowels (which can be looted from unconscious inmates), and making shovels and pickaxes are the way to go. The multitool is the best digging/chipping tool ''and'' has 100 uses, so getting this as soon as possible is advisable. |
||
| + | # Get your hands on as much timber as possible. You will need an ungodly amount of it for timber braces, tool handles, and upgrading pickaxes, so buy it or loot it whenever you can. |
||
| + | # Now this is when the digging starts. Go to the top LEFT corner in the deliveries room that is BEHIND THE TRUCK. Make sure you only dig the entrance to your tunnel in THIS EXACT SPOT. You need to be standing exactly here or the tile directly south of this spot ''while you are digging'' because this is the security camera's blind spot. If you do it one tile to the right the cam will see and you will be sent to solitary once a guard comes. This is also abusing the fact that the guards never patrol around this area, and will only ever come to the deliveries room if the camera sees something. We do things in the delivery room because other inmates will never come around and you don't need to cover the tunnel entrance with dirt anytime you leave because the guards won't see. |
||
| + | # Whenever you get the chance, dig your tunnel north. You need to be supporting your tunnel with the braces so you can keep digging. Make sure you maintain your deliveries job because if you lose it, you lose any progress you made up to that point. |
||
| + | # Dig until you reach the electric fence. Place the timber brace down next the the fence now so you won't need to do it during the execution. We need to turn the generator off and clip it. Now is when our little side expedition begins. |
||
| + | |||
| + | '''Side Expedition Prep''' |
||
| + | |||
| + | # Get your hands on: |
||
| + | ## Guard outfit |
||
| + | ## Plastic utility key |
||
| + | ## 2 Posters |
||
| + | ## 2 Fake Fences |
||
| + | ## Sturdy Clippers |
||
| + | # How you get these doesn't matter as long as you don't risk going to solitary over it. |
||
| + | # Chip the wall leading into the showers from your cell while no one is looking. Once the wall is out, cover it with a poster. |
||
| + | # Chip a wall leading from the showers to the courtyard while no one is looking. Once the wall is out, cover it with a poster. |
||
| + | # Make sure you keep the three supervising guards' opinion of you at 30 or above or else they'll take down your posters and you'll go to solitary. |
||
| + | # Chip the fence leading from the canteen into the courtyard while no one is looking until it is ''one chip away'' from coming out. DO NOT CLIP IT ALL THE WAY YET. |
||
| + | |||
| + | '''Side Expedition Execution''' |
||
| + | |||
| + | # Once you've got everything prepared, wait until evening rollcall and hope you're name isn't called. If it is, the execution will have to wait until the following night. |
||
| + | # If your name isn't called, quickly run to your cell. Grab your guard outfit, plastic utility key, sturdy clippers, and 2 fake fences, place the bed dummy in your bed and put on the guard outfit and get out of the cell as quickly as possible. |
||
| + | # Once lights out is called, go over to the fence at the canteen that is one clip away and clip it. Walk through the hole you made (DO NOT place the fake fence down because you will still need to get out of the canteen) and go over to the bottom right corner and through the utility door. |
||
| + | # Take the ladder up to the roof. Quickly go north to the generator and clip the fence around it. Now get ready to be fast. |
||
| + | # Turn off the generator and run back towards the ladder. DO NOT replace the fence yet just in case the generator turns back on while you're running. Take the ladder down and run through the hole in the fence. Run to the deliveries room and go down your tunnel. As fast as you can, run to the fence and clip it with your sturdy cutters. Make sure you're listening for the sound of the generator turning back on while you're clipping because if it does and you're clipping it, you're knocked out and run's failed. |
||
| + | # If the generator turns back on before you've clipped the fence all the way, repeat steps 4-5 again until the fence is out all the way. |
||
| + | # Once the fence is clipped, go back to the roof and replace the missing generator fence with the fake fence. Then take the ladder back down and, while you're in the COURTYARD, replace the fence. Don't do it while you're in the canteen or else you'll be locked in. |
||
| + | # Run over to the poster in the shower wall, remove it, go into the showers, and replace the poster. Then go over to the poster connecting your cell and the showers, remove it, go into your cell, and replace the poster. Remove your bed dummy and take off your guard outfit and put them away. Side expedition success. |
||
| + | |||
| + | '''Tunnel Prep Continued''' |
||
| + | |||
| + | # After that whole thing, continue digging north in your tunnel. If you come across a mine in your way, DIG AROUND IT. Don't walk into it or dig it or else you'll be blown up. |
||
| + | # Once you reach a reinforced concrete wall, your tunnel has finally reached its end. Get ready for the full escape. |
||
| + | |||
| + | '''Escape Execution''' |
||
| + | |||
| + | # Get all of this for the escape: |
||
| + | ## Guard outfit |
||
| + | ## Bed dummy (you should still have these last two from the side expedition) |
||
| + | ## Multitool (you should already have this from the tunneling; make sure it's got at least more than 10 durability) |
||
| + | ## Poster |
||
| + | ## Optional: Stinger strip |
||
| + | # Once you've got all this, wait until your next evening rollcall. If your name is called during this time, you'll need to either put all your contraband in another desk or wait until the following night for the escape. |
||
| + | # If your name isn't called, run to your cell, put your bed dummy in your bed, put on your guard outfit, and grab the multitool and poster. |
||
| + | # Get out of your cell before it locks and run to the deliveries room. Wait until lights out before going into your hole or risk getting lockdown called on you. |
||
| + | # Once lights out is called, go into your tunnel and go all the way to its end. Wait until you hear the sound of the perimeter jeep passing above before digging up. When you hear the jeep pass, begin digging up at the tile against the reinforced concrete. When the hole is dug, go up. |
||
| + | # When you're out of the hole, fill it in with the dirt you would have got. If you got a stinger strip for this, use the stinger strip to disable the jeep. Otherwise, only perform these next steps while the jeep is not around. |
||
| + | # Start chipping away at the perimeter wall. If you don't have a stinger strip, and the jeep comes around QUICKLY replace the hole you've made with the poster while the jeep is passing. Once it goes away again, remove the poster and continue chipping. |
||
| + | # Once both walls are out, run into the border and you're out! |
||
| + | ==Trivia== |
||
| ⚫ | |||
| + | * It is unknown how the guards leave the prison to go home if there are landmines around. It is possible that they go home via a secret underground route with maximum security. |
||
| + | * Sombreros, burritos, ponchos, and chili peppers are exclusive to the prison. |
||
| + | ** However, the chili peppers are not consumables. |
||
| + | * Due to the landmines and staff door, it is not possible to do a regular Prison Takeover. It is theoretically possible to knock out enough guards to unlock the white door and leave through there, but since this must be done at night, and you have to have a tunnel to the outer wall anyway, this is both extremely difficult and not worthwhile. |
||
| + | * The prison is based off of the prison Penitenciaría Federal de Sona from season 3 in the popular TV-show Prison Break. |
||
| ⚫ | |||
| ⚫ | |||
| − | This is by no means the most efficient solution, but it works. This all can’t be done on one night. In my attempt, I dug 3 spaces per night. |
||
Latest revision as of 17:31, 8 October 2023
| San Pancho | |
|---|---|

| |
| La Cucaracha! | |
| Details | |
| Prison Type: Camp | |
| Difficulty: Hard | |
| Inmates | 15 |
| Guards | 10 |
| “ | This is the notorious San Pancho, the roughest toughest and downright nastiest prison south of the border. The blistering heat and claustrophobic conditions here turns inmates angry and violent. Even the guards daren't enter.
|
„ |
| ~ Warden Bob Ryan on Prison arrival |
San Pancho is the fifth map present in the main game, preceded by Jungle Compound and succeeded by HMP Irongate. The prison holds 16 inmates (yourself included), has 10 Guards that never patrol in the compound except 3 for Routine, has an electric fence around the prison and a jeep patrolling the outside. It holds 4 inmates per cell. Most of the time there is an unoccupied desk in your cell. It’s easy to get away with stuff guards won't like such as chipping walls because they don't patrol the area except in routines. San Pancho's security is very high, as it has a 2 block thick perimeter wall and landmines in between, making an escape above ground nigh-impossible. In the Mobile/Console editions with HMP Irongate nerfed (Camera in only half of the cells and guards only use batons), both prisons can be found equally hard.
San Pancho also has its own unique free time music.
Characteristics[ | ]
Lack of supervision[ | ]
A brutal prison with unforgivingly hot weather, San Pancho makes the inmates so ferocious and bad-tempered to the point the guards are frightened of them. Guards do not patrol the inmate section of the prison whatsoever, allowing for the player to get away with a lot of illegal activities. Three guards will be present at meals, exercises, showers and roll calls.
In addition to that, the prison lacks any scanners to detect contraband, making foil useless. Cameras are also not present except for the Solitary, the kitchen, and the cargo job room.
Landmines[ | ]
The prison features landmines (Marked as orange dots labeled 'M' on the map) at the perimeter of the prison beyond the Electric Fence, forcing the player to tunnel underground for their escape. Attempting to cross the perimeter beyond the fences on ground level will kill the player at all circumstances.
Landmines are invisible on ground level, however they can be seen underground and will take one block space, displacing a usual dirt block. Landmines will explode if a player approaches ~3 block radius on ground level. They will also explode if a player comes into contact underground while tunneling. They deal infinite damage, instantly knocking out the player and sending him to Infirmary or their cell depending on the time.
Jeeps[ | ]
A jeep patrols the perimeter of the prison beyond the Electric Fence, further deterring escape attempts. If you are caught by the jeep while wearing POW Outfit or its variants, you will be immediately sent to Solitary. They can be avoided by wearing Guard Outfit at night or by using Stinger Strips to destroy the tires.
Schedule[ | ]
| 08:00 - 09:00 | Morning Rollcall |
| 09:00 - 10:00 | Breakfast |
| 10:00 - 13:00 | Leisure / Work Period |
| 13:00 - 14:00 | Exercise period |
| 14:00 - 17:00 | Free Period |
| 17:00 - 18:00 | Dinner |
| 18:00 - 21:00 | Leisure / Work Period |
| 21:00 - 22:00 | Shower |
| 22:00 - 23:00 | Evening Rollcall |
| 23:00 - 08:00 | Lights out |
Guards will only be present to supervise at Roll calls, Meals, Exercise periods, and Showers.
You can stay out of your cell after Lights out (without a Bed Dummy) undetected for approximately ~1 hour in game time due to the guards very rarely patrolling the cells.
Jobs[ | ]
- Gardener (Default)
- Tailor/ Outfit Making
- Librarian
- Kitchen
- Unloading
Strategies to Escape[ | ]
Common Method[ | ]
1. Get 8 Plastic Forks.
2. Create 2 Posters.
3.Create a Bed Dummy
4. At the wall of the Tailor workshop, chip away the wall so you can get into the tailor station. (The station is located near to the Deliveries job workshop.) An optional way to do it is to get the Tailor job. Just distract them by ether knocking them out and stealing their clothes repeatedly, or hit them once and run around the courtyard until 13:00 when work ends. This will allow you to use work periods as a time to safely work instead of during other periods.
5. Chip the wall beyond the station, so you have access to the maintenance tunnel (the area with a black tile floor). You should see a ladder, and a prisoner stash. Cover the two holes with a Poster, or you'll be sent to Solitary.
6. Obtain a very good digging/chipping tool. Multitool is the best. You will also need a good cutting tool; Sturdy Cutters are the best. 3 Wires are also necessary in order to make a Fake Fence. However, likewise from my experience, there is no need to bring a Fake Fence like you will see in step 13.
7. Get your intellect up to 80+.
8. Find a guard with a Utility Key. This may be an issue to even find a guard alone because they only patrol outside the prison unless conducting showers, meals, exercise periods, and roll calls. Take his outfit, the Utility Key, and Baton if needed.
9. Create a plastic version of it; you need a Wad of Putty and Molten Plastic. Combine the Utility Key with Wad of Putty. This'll give you a Utility Key Mold, and a Utility Key. Put the key back into the pocket of the guard. Combine the Utility Key Mold with Molten Plastic, and ta-da! You got yourself a Plastic Utility Key! Make sure to put the real key back on the guard!
10. Do the same with the guard with Cell Key ( or you can forget the cell key and chip some walls to navigate around the prison without it), or cut a hole in the cell's fence and hide it with a Fake Fence.
11. Go to the maintenance tunnel of the tailor station, then dig down. Dig straight until you meet a blue fence. Remember to brace the tunnel with Timber Braces! (Make sure you DO NOT dig under where the Prisoner stash or ladder is otherwise you will end up hitting a landmine later on! Although digging under a landmine doesn't do anything, so just dig past, or move to the left or right from your escape hole 1 block.)
12. At nighttime, put the Bed Dummy into your bed. Put your Guard Outfit on. Your inventory should look like this: Plastic Utility Key, Plastic Cell Key, your cutting tool, and Fake Fence. Go to the canteen (Eating place). If you did not make a plastic cell key, then you will need to chip through to either the garden supply room or the kitchen, and then to outside. connected to the canteen there should be a door with a orange lock (cyan on console) and beyond the door, a ladder. Go up to the ladder!
13. You should be on the roof. Go north, then you'll see the Generator. Cut the fence near the Generator, shut off (Left click), put the Fake Fence where you've cut it or just leave it. (Only from my experience). then run back to your tunnel as quick as you can, then cut off the electric fence as soon as you can. It'll no longer zap you because the Generator is off. If you are too slow the generator will turn back on and you will need to repeat this step . (This step is not required for the NS edition, as the fences are not electrified)
(Optional) 14. Obtain 3 or 4 Stinger Strips. You can craft them with 2 Nails, and 1 Roll of Duct Tape. ( 1 Nails + 1 Roll of Duct Tape on Mobile )
15. Whenever you have free time, go to your hole, and dig straight until you reach Reinforced Concrete. It's like a square-ish rock, but you cannot dig or even chip through like stones.
The Escape
1. At night, put the Bed Dummy into the bed and equip the Guard Outfit on. Your inventory should look like this: Your digging/chipping tool, 3 or 4 Stinger Strips, and extra food (optional)
2. At the very end of your tunnel, wait until you hear the perimeter jeep. After the jeep sound is gone, dig up!
3. Cover the tunnel with the Dirt you just obtained. Put one Stinger Strip one tile below you. That's the route for the jeep, and the Stinger Strip should flat-tire the jeep. If you did not get stinger strips, then follow the wall counter-clockwise to the entrance at the south end of the prison, where the wall is one layer thick instead of two, and chip through.
4. Put the next strip 4-6 blocks left to the first strip. But, don't walk around, or you'll be blown up immediately! If you want to walk around, hug the edge, as if you are stuck to the wall. Don't get out of the wall except if you place the strips!
5. Now, chip the wall where you want to chip. Careful of jeeps, but they'll be disabled with the strips. When they get flat-tired, you'll hear a shooting sound. There are two layers of walls, but if you get through them, you can say goodbye to San Pancho!
Another way to shut off the generator WITHOUT keys is to get a good cutting tool, Grappling Hook, a Sheet Rope, and a Fake Fence.
After evening roll call, go up the ladder in the maintenance tunnel of the tailor shop. Go east and use the grappling hook on the wall. Keep going east and use the sheet rope.Go to the generator and cut the fence surrounding it, left click to shut it off, and replace the broken fence with the fake fence. Run as fast as you can back to the tunnel and cut the fence, since the generator is off and it won't shock you.
Other Methods[ | ]
- From your cell, tunnel towards the main door (make sure to cover the hole with a desk) from which the guards enter the prison. Keep tunneling until you reach a rocky barrier that you can no longer tunnel through. (Note: a multitool is the fastest way to dig). At lights out, put on a guards outfit, and then head into your tunnel. Wait until you hear the jeep pass and then dig up. Then with the pickaxe, chip through both walls, and replace the bricks as you go and then your home free!!
- For this method, you’d want 5 posters in these locations: The middle of the bottom wall of your cell, The middle of the bottom of that cell, To the right wall of the job area where you can’t access normally (you should be in there now), One to the left of the door to the tailor job (you can skip this if you get the tailor job), and one on the north wall of the tailor job. At night, pit on a guard outfit and go up the ladder. Use a sheet rope to go down on the left side. You have to be precise to go on the wire. If you fall, you’ll need to get a red key to go back to the main campus. If you don’t fall, go down the ladder on the building. You’ll end up next to an infinite supply of timber and metal sheets. If you want, you can chip through to it and get it. But even if you do, you’ll have to dig. You can dig 4 spaces to reach the fence. On the mobile game, the fence isn’t electric. I can’t guarentee it won’t be electric on other systems. Get past the fence and dig until you can dig up. The guards won’t catch you because they never patrol this area. After you dig up, go to the outer wall. If you want, you can ambush the Jeep with stinger strips. In my escape, I was able to chip through the outer wall. If you can’t, just dig under it. Once you dig up from your hole, you have to escape on that run. If you don’t, your hole will be covered and you’ll lose all progress.
Digging[ | ]
Land Mines surround the entire perimeter of the main prison complex beyond the electric fence. There is no way for the player to escape on ground level, as the mines will explode no matter where you try and escape from. Therefore you must tunnel out to escape.
Preparation
- Gather supplies to craft Sturdy Shovels and optionally Sturdy Pickaxes for crafting the Multitool.
- Also bring Candles if light is needed, and Timber Braces in abundance to support the tunnel.
- Sturdy Cutters should be crafted to cut through the underground electric fence.
- Collect materials to craft two Plastic Keys, namely the Cell and Utility keys.
- Obtain a Guard Outfit and Bed Dummy for nighttime maneuvers.
- Plan out a tunneling escape - particularly find ways to dispose of Dirt safely.
The Escape
The best way to escape is to start in your cell and use your desk to cover the hole. Dig west (to the left) until you encounter the underground fence.
The fence cannot be cut, as it is electrified. You must first go up on the roof to disable the Generator. The recommended way to do this is to place a bed dummy in your bed after lights out, and exit your cell into the canteen and enter the utility corridor to the bottom right of the canteen. The ladder will go to the roof and the generator will be directly up north from the ladder. The generator will restart after 1 in game hour, so you've got to be quick! Be advised that the generator on the roof is surrounded by a fence, so you must bring a cutting tool to the roof with you.
Once the fence underground is cut, you can continue digging your tunnel. In your tunnel, dig a few spaces west, and you will be able to see the land mines. Dig your tunnel around them, being careful not to touch the space they occupy or they will explode. Dig your tunnel a good 4 or 5 spaces past all of the mines and then you are safe to dig up to the surface to escape! Beware of the patrol jeep that circles the perimeter above on the surface beyond the mine field. If the jeep rolls by and spots any damage to the surface, even an incomplete hole, you will be sent to Solitary. Note that the jeep goes counter-clockwise around the perimeter (so if you are on the left side, the jeep will be coming down south). You can hear the jeep pass by from underground. Wait for the sound to pass and then dig up. Alternatively, a Stinger Strip can be used at the surface to disable the jeep, but since you are digging, this is not a viable option.
Every time you start a new game in San Pancho, the land mine placement will be generated randomly, but in the same vicinity. So one playthrough you may not have a mine blocking your tunnel path, but another game you might have several mines in your way! Always be prepared to dig around the mines whenever you play San Pancho!
Tunneler's Dream[ | ]
Tunnel Prep
- Get the delivery job. This can be accomplished by either knocking the current delivery inmate out and keeping him out with a rope or duct tape or repeatedly knocking him out (not advisable) or hitting him once and running around the courtyard with him chasing you, while making sure to not break his aggro on you.
- Get your hands on as many digging and chipping tools as possible. Plastic forks and spoons, trowels (which can be looted from unconscious inmates), and making shovels and pickaxes are the way to go. The multitool is the best digging/chipping tool and has 100 uses, so getting this as soon as possible is advisable.
- Get your hands on as much timber as possible. You will need an ungodly amount of it for timber braces, tool handles, and upgrading pickaxes, so buy it or loot it whenever you can.
- Now this is when the digging starts. Go to the top LEFT corner in the deliveries room that is BEHIND THE TRUCK. Make sure you only dig the entrance to your tunnel in THIS EXACT SPOT. You need to be standing exactly here or the tile directly south of this spot while you are digging because this is the security camera's blind spot. If you do it one tile to the right the cam will see and you will be sent to solitary once a guard comes. This is also abusing the fact that the guards never patrol around this area, and will only ever come to the deliveries room if the camera sees something. We do things in the delivery room because other inmates will never come around and you don't need to cover the tunnel entrance with dirt anytime you leave because the guards won't see.
- Whenever you get the chance, dig your tunnel north. You need to be supporting your tunnel with the braces so you can keep digging. Make sure you maintain your deliveries job because if you lose it, you lose any progress you made up to that point.
- Dig until you reach the electric fence. Place the timber brace down next the the fence now so you won't need to do it during the execution. We need to turn the generator off and clip it. Now is when our little side expedition begins.
Side Expedition Prep
- Get your hands on:
- Guard outfit
- Plastic utility key
- 2 Posters
- 2 Fake Fences
- Sturdy Clippers
- How you get these doesn't matter as long as you don't risk going to solitary over it.
- Chip the wall leading into the showers from your cell while no one is looking. Once the wall is out, cover it with a poster.
- Chip a wall leading from the showers to the courtyard while no one is looking. Once the wall is out, cover it with a poster.
- Make sure you keep the three supervising guards' opinion of you at 30 or above or else they'll take down your posters and you'll go to solitary.
- Chip the fence leading from the canteen into the courtyard while no one is looking until it is one chip away from coming out. DO NOT CLIP IT ALL THE WAY YET.
Side Expedition Execution
- Once you've got everything prepared, wait until evening rollcall and hope you're name isn't called. If it is, the execution will have to wait until the following night.
- If your name isn't called, quickly run to your cell. Grab your guard outfit, plastic utility key, sturdy clippers, and 2 fake fences, place the bed dummy in your bed and put on the guard outfit and get out of the cell as quickly as possible.
- Once lights out is called, go over to the fence at the canteen that is one clip away and clip it. Walk through the hole you made (DO NOT place the fake fence down because you will still need to get out of the canteen) and go over to the bottom right corner and through the utility door.
- Take the ladder up to the roof. Quickly go north to the generator and clip the fence around it. Now get ready to be fast.
- Turn off the generator and run back towards the ladder. DO NOT replace the fence yet just in case the generator turns back on while you're running. Take the ladder down and run through the hole in the fence. Run to the deliveries room and go down your tunnel. As fast as you can, run to the fence and clip it with your sturdy cutters. Make sure you're listening for the sound of the generator turning back on while you're clipping because if it does and you're clipping it, you're knocked out and run's failed.
- If the generator turns back on before you've clipped the fence all the way, repeat steps 4-5 again until the fence is out all the way.
- Once the fence is clipped, go back to the roof and replace the missing generator fence with the fake fence. Then take the ladder back down and, while you're in the COURTYARD, replace the fence. Don't do it while you're in the canteen or else you'll be locked in.
- Run over to the poster in the shower wall, remove it, go into the showers, and replace the poster. Then go over to the poster connecting your cell and the showers, remove it, go into your cell, and replace the poster. Remove your bed dummy and take off your guard outfit and put them away. Side expedition success.
Tunnel Prep Continued
- After that whole thing, continue digging north in your tunnel. If you come across a mine in your way, DIG AROUND IT. Don't walk into it or dig it or else you'll be blown up.
- Once you reach a reinforced concrete wall, your tunnel has finally reached its end. Get ready for the full escape.
Escape Execution
- Get all of this for the escape:
- Guard outfit
- Bed dummy (you should still have these last two from the side expedition)
- Multitool (you should already have this from the tunneling; make sure it's got at least more than 10 durability)
- Poster
- Optional: Stinger strip
- Once you've got all this, wait until your next evening rollcall. If your name is called during this time, you'll need to either put all your contraband in another desk or wait until the following night for the escape.
- If your name isn't called, run to your cell, put your bed dummy in your bed, put on your guard outfit, and grab the multitool and poster.
- Get out of your cell before it locks and run to the deliveries room. Wait until lights out before going into your hole or risk getting lockdown called on you.
- Once lights out is called, go into your tunnel and go all the way to its end. Wait until you hear the sound of the perimeter jeep passing above before digging up. When you hear the jeep pass, begin digging up at the tile against the reinforced concrete. When the hole is dug, go up.
- When you're out of the hole, fill it in with the dirt you would have got. If you got a stinger strip for this, use the stinger strip to disable the jeep. Otherwise, only perform these next steps while the jeep is not around.
- Start chipping away at the perimeter wall. If you don't have a stinger strip, and the jeep comes around QUICKLY replace the hole you've made with the poster while the jeep is passing. Once it goes away again, remove the poster and continue chipping.
- Once both walls are out, run into the border and you're out!
Trivia[ | ]
- It is unknown how the guards leave the prison to go home if there are landmines around. It is possible that they go home via a secret underground route with maximum security.
- Sombreros, burritos, ponchos, and chili peppers are exclusive to the prison.
- However, the chili peppers are not consumables.
- Due to the landmines and staff door, it is not possible to do a regular Prison Takeover. It is theoretically possible to knock out enough guards to unlock the white door and leave through there, but since this must be done at night, and you have to have a tunnel to the outer wall anyway, this is both extremely difficult and not worthwhile.
- The prison is based off of the prison Penitenciaría Federal de Sona from season 3 in the popular TV-show Prison Break.